A few weeks ago I was teaching the weft interlock to a student, when we both observed that it sometimes looked really good and other times it looked awful. I have always hated using this technique and now I know why! Because I was doing it wrong.

After consulting many books, and trying it out myself, I finally made sense of it.

Carol Russell’s book explains it, but I couldn’t understand the explanation until I tried it.
Here goes.
When the 2 wefts meet in the same shed, they will meet between 2 warps.

One of those wefts will have to go under a raised warp afterwards, and it is THAT WEFT that must go under the other, then back over it and weave itself into the next shed first.
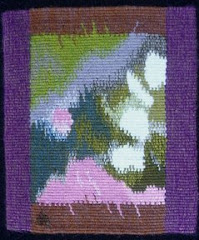
If you do it the other way, then the join will look lumpy, as you can see in this example.
Here you can see the correctly woven join at the bottom, then when I shifted to the next warp space on the right, but continued to weave the left weft first, it came out wrong. Messy and lumpy.
So instead of saying that you must always weave the left hand (or right hand) weft first, which is what I used to say, I would now say that you have to judge it by which one goes UNDER a RAISED WARP; and that will change each time you move to the next space.

So if you are moving over one warp at a time, you will have to alternate left and right. Try it! You’ll see.
Now that I’ve got the hang of it, I’ve discovered what a lovely join it is, and have been playing with it this weekend, so that I can offer examples for my students. It certainly makes a lot of sense when you have a long vertical line.
I realize that this will be different if you weave all your wefts in the same direction while in the same shed, but since I preach the “meet and separate” method, where adjacent wefts go in opposite directions in the same shed, this is how it works for me.

The weather has been perfect, and I enjoyed paddling my kayak in Cape Cod Bay. The water was not as cold as I expected, so I even went for a brief swim yesterday. This morning it was so smoky that I couldn’t stand being outside. We discovered it was from wild fires hundreds of miles to the north in Quebec, but luckily for us, the wind changed in the afternoon and the air cleared.


2 comments:
Does this description assume that you are weaving with the front of the weaving toward you? I weave looking at the back of the tapestry, so then I would do the opposite so the "nice" side of the join is away from me while weaving??
If this is true, then I think you have just described the join I have been using. However, my teacher (Koehler) always sets this join up with wefts going the same direction. This can complicate things when I am using meet and separate other places in the piece (I also tend to weave all the way across and use the loom beater). So if I can modify my technique with your description, I might be able to use meet and separate even for this join as long as I pay attention to raised and lowered warps. Cool! I'll try it.
Hi Rebecca. Yes, I do weave from the front, but I just tried it on the back side of my frame loom and I believe that the instructions remain the same. It looks exactly the same on both sides, and when you do it on the back side, the opposite warps are up and the opposite wefts wrap first so it still comes out exactly the same. I think....let me know what you find. The main thing is that if your join is looking wrong, lumpy etc, just remember the weft that goes under a raised warp should be the one that goes first.
Post a Comment